Interior
How To Install A Chair Rail
TL;DR: Adding a chair rail is a simple DIY project that adds architectural style and wall protection to any room. Typically installed about one-third up the wall, chair rails help separate two-tone paint or wainscoting from the upper wall. With the right tools—like a level, measuring tape, saw, and finish nails—you can complete this trim upgrade in a weekend. It’s a great way to enhance your interior moulding game on a budget.
Need help choosing trim or moulding? Contact Builders Surplus or call 866-739-1636 to speak with our knowledgeable team.
Moulding and millwork adds a personal and decorative touch to any room in your home. A chair rail not only adds interest, but also helps to protect walls from furniture. Here’s a guide on how to install a chair rail in your home.
Prep: How to install a chair rail
Step 1 – How much moulding do you need?
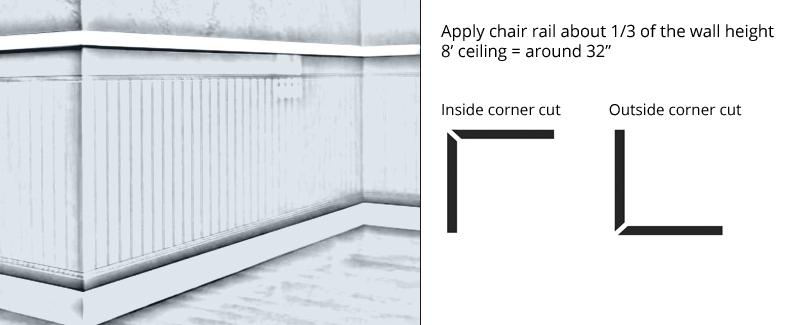
Before you purchase materials, determine how much moulding is needed by measuring the length of your walls at the appropriate chair rail height. As a rule, chair rail should be applied one-third of the way up the wall from the floor. For a room with an 8-foot ceiling, installing the chair rail at around 32 inches is a safe bet. When deciding how much to buy, make allowances for miter cuts (and mistakes) by adding about one foot to the length of each wall.
Step 2 – Match your room’s trim
Installation will be easiest and look best if the moulding is similar to (and no thicker than) the trim around doors and windows. Whether simple or ornate, Builders Surplus offers a huge variety of moulding and millwork.
Step 3 – Prep work
Paint or wallpaper the room before installing a chair rail, and plan to touch up afterward as necessary. Next, find the wall studs and mark their locations with masking tape or a pencil. Use a level and measuring tape to draw a guideline around the room at the height where you want the chair rail to sit. If the floor isn’t level (very common in older homes), split the difference between the guideline on the wall and a consistent measurement from the floor, otherwise the chair rail could end up looking crooked even if it is level.
Getting ready to cut & fit
Step 4 – Inside & outside corners
Evaluate your space to figure out a plan of attack for cutting the moulding to fit. If possible, start at a window or doorframe requiring only one piece of molding that can be cut at a 90° angle on both ends.
If a wall runs longer than your longest piece of moulding, connect two pieces with a miter joint. The two should join over a wall stud. First measure along the wall and cut the mouldings to a length at which they will overlap at the stud. The cuts should be at opposite 45° angles. For outside corners, a miter joint formed from two matching 45° angles will do the trick. Not all outside corners are perfect right angles, however, so use scrap pieces to test the corner angle before making a cut on your moulding.
Step 5 – Applying stain or paint
Staining or painting? Apply stain to the moulding before attaching it to the wall; touch up after as necessary. But if you plan to paint, purchase primed chair rail and mouldings from Builders Surplus; then paint the moulding once it’s set.
Installing the chair rail
Step 6 – Installation
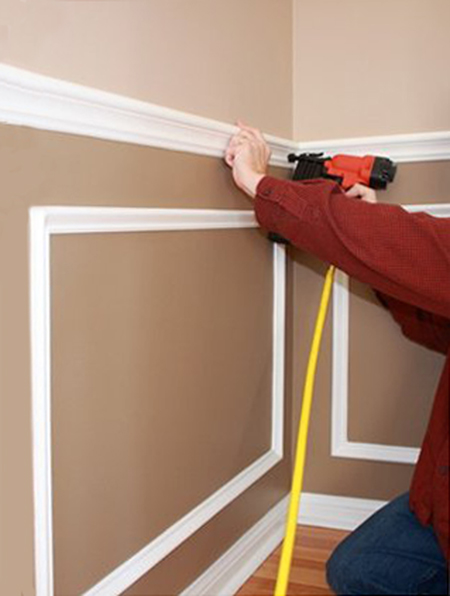
To install a chair rail, apply wood glue or construction adhesive to the back of the first piece. Attach it to the wall, placing the bottom edge of the wood at the guideline marked (step 3). Secure each piece with two 2-1/2” finishing nails in line with each other. When bringing two ends together in a miter joint, add extra wood glue at the joint, and complete the seam with two finishing nails into the studs. Use a nail set to recess the nail heads to achieve a smooth appearance. Continue with each piece until you complete the room.
Step 7 – Finish & admire!
Once you’re sure all nail heads are recessed, use wood filler to fill in all the holes or gaps at joints and seams. Lightly sand the filler and joints. Apply a bead of caulk at the top and bottom edge of the molding where it meets the wall. Finally, complete any touch-ups or finish coats as necessary. Then step back to admire a job well done!
FAQs: Installing a Chair Rail
Q: What is a chair rail?
A: A chair rail is a type of decorative trim that runs horizontally along a wall, usually 30–36 inches above the floor. It protects walls from scuffs and adds a classic, finished look.
Q: How high should I install a chair rail?
A: Standard height is about ⅓ the height of your wall. For an 8-foot wall, that’s approximately 32 inches from the floor.
Q: What tools do I need to install a chair rail?
A: You’ll need a tape measure, level, miter saw, hammer or nail gun, wood glue, and caulk for finishing.
Q: Should I paint or stain chair rail before installing?
A: It’s often easier to prime and paint or stain before installation, then touch up afterward as needed.
Q: Can I install a chair rail over textured walls?
A: Yes, but you’ll want to make sure it’s secured tightly. Use adhesive in addition to nails for better grip on textured surfaces.
Q: What type of moulding should I use for a chair rail?
A: Choose from decorative wood or MDF trim. Builders Surplus carries a wide variety of moulding styles to match any décor.
Information used with permission from Metrie.